INSIDE: Here’s an easy DIY colored sand recipe that you can make at home for pennies. I love this secret method for how to make colored sand on a budget!
Colored sand is a simple way to decorate for a bridal shower or even a wedding. It’s also a fun activity for kids to make colored sand crafts, such as rainbow sand art, a Zen sand tray or sand art mandalas. You can make the colorful sand yourself and save a lot of money!!

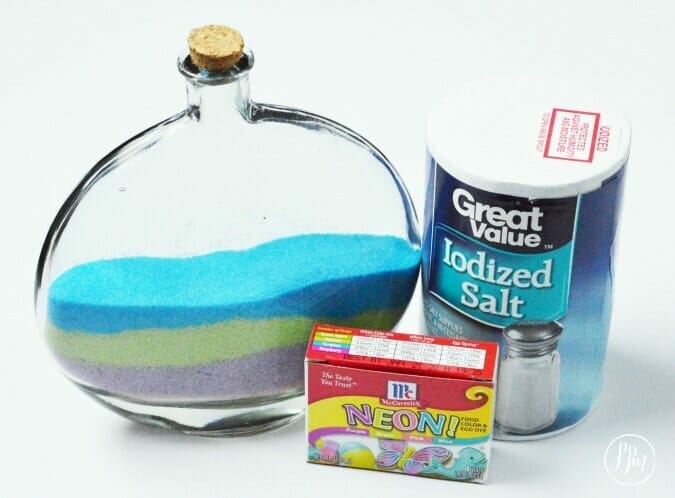
I’m going to let you in on a little secret. You don’t have to use sand to get the color you want. In fact, I didn’t even use sand. I found a way to make colored salt.
Salt?
Yep! It works better than sand, and no one will be able to tell the difference. If you’ve priced colored sand, you know it can be expensive. This recipe to make sand in the colors you want costs pennies a batch. It all starts with standard table salt and affordable baking dye. That’s it!
Once you make your own DIY colored sand, you can use it to decorate for baby showers and other festive events. It looks great in the bottom of a vase of flowers and to decorate a mantle for holidays, such as Easter or Halloween.
Try some of these other DIY ideas, too:
- DIY Henna Tattoos
- DIY Play Dough
- DIY Moon Sand
- Floral Letters
- No-Sew Copycat Moby Wrap
- Bubble Activities for Toddlers
- DIY Bubble Solution
HOW TO COLOR SAND
SUPPLIES
Table salt
Food coloring (liquid, not gel)
Jar, vase or another container (something like this with colored sand and flowers would be gorgeous)
DIRECTIONS
First, you need to determine the amount of salt to color. Fill each container to know for sure how much you’ll need. Then split the salt into separate bowls, one for each different color sand you’ll need.
Next, measure the amount of salt in each bowl. Add three or four drops of food coloring for each 1/4 cup of salt. For example, if you have 1 cup of salt, you would add 12 to 16 drops of food coloring. Keep in mind that the more vibrant colors you want, the more drops you’ll need to add. If you’re looking for very muted or light tones, add fewer drops.
Using a small whisk or fork, mix the coloring and the salt with a rapid motion. While mixing, check for clumps and make sure you break them up. Continue until all the coloring is dispersed and there are no salt clumps.
The final step is to layer the colored salt back into your containers. You’ll never be able to tell that it’s salt and not sand. This is a much more affordable option for sand art bottle decorations or kids’ craft sand.
For just pennies, you’ll have all the colored sand you need!